Thursday, September 22, 2011

Tea Tree Oil Treatment

My skin has it's ups and downs but for the most part, it has been on high alert and a good part of my upper body is covered up acne. It's probably stress and a crappy diet. I've been eating less greens and more prepackaged stuff along with nightly snack raids, and it has not been doing me any good.

I've been using Hollywood Beauty's Tea Tree Oil mixture that I bought at Rite aid for around $4 and it's not 100% but mixed with other oils with the main one being Soybean Oil. Not too glad about that but I would probably see if I can get 100% next time. I've been using this sparingly, for the first week. I moistened a cotton pad with with water and added a drop pf this oil and ran it on my face with no moisturizer afterwards. For nighttime, I would use my regular facial lotion mixed with my Philosophy C booster to help lighten up any marks. Now, I apply a drop of oil directly on my face and blot any extra off with a tissue.

WARNING: This post contains nasty and graphic pictures of acne marked skin. So look at your own risk!

OK, with that out of the way, this is week 1.

I have massive cystic pimples all over the right side of my skin. With redness and bumps all over my skin. Ouch.

Week 4 results:
Cystic acne is mostly gone but left with tiny bumps on the skin. No real inflammation left, but still has red acne marks left over.

Right Side Week 1: Not as bad as the other side, but still has tiny pimples and a good amount of redness.
Week 4: No big change except for a tiny decrease in pimples.
I haven't gotten anymore cystic acne, but I am left with tiny bumps. I might just go back to the cotton pad method just to see if it's the oil clogging up the pores, since I've been using it a bit drastically in my fourth week. Overall, this maybe a routine I might stick to, just to see how well it plays out. I'll keep you updated, but this method is not one that I'd thoroughly recommend yet. I liked it when I first started it, but the tiny bumps worry me.

Thursday, September 15, 2011

Green Tea Frappuccino

Way back when, I told you that I will do non-beauty related posts and finally the day has come. This post will be unnecessary to most so feel free to wait for the next one. If you've ever tried a Green Tea Frappuccino at Starbucks, you'll know that green tea tastes nothing like this and the maker of this drink should be put down, but as months go by, one day you'll just crave this drink without even noticing why. While I'm not a master barista, I think I've figured out their secret.

If you didn't know Starbucks seems to be using Tazo products for their tea blends and while I was at Target one day, I picked out the one thing that would make my homemade frapp a success.
BAM! A matcha concentrate that is not only good but on clearance. Now I know what people mean when they say "this is a sweet deal" (bad pun). I don't have to add any extra sugar and while the instruction tells me to warm this up, I can drink this hot or cold. Add about 1 1/2 cup of this to 1cup of milk. You can adjust this ratio depending on your taste. I prefer mine to taste more green teay.
Now listen people, I know milk is pricey but you will taste a difference when you switch to organic milk. The milk tastes creamier and richer even when it's 1%, so it's even better for you then regular milk. I don't have the balls to switch to skim, but I plan to one day. So go around and start trying out different brands; I personally recommend the Target and the Waldbaums brand over the Horizon brand. However, the best milk that I have ever tasted was from Tel Aviv; I don't remember the brand but it was so darn good. If you live in Israel, you have the best tasting milk evar... you lucky bums.

Now fill your blender or the magic bullet look alike with about 4-5 ice cubes, and blend away.
This has been the representative drink of the summer for me, and I've gone through cartons of milk by drinking this everyday. While coffee is the ambrosia all year round, I really enjoyed this and it is a perfect rip off of Starbuck's Green Tea Frappuccino, minus the cost. Since colder weather is approaching at a rapid pace, I plan to switch to homemade hot chocolate and yuzu tea. Yuzu or citron tea is the bomb-diggity when it comes to winter drinks but for this summer, my Green Tea Frappuccino has been a real champ.

I've been experimenting with Tea Tree Oil and I've been using it for about three weeks, so I'll post a review on that when I can.

Thursday, September 8, 2011

Nars Lipgloss in Easy Lover

The weather here in the big apple has been a fickle mistress lately and I just can't stand it. I'll just chill with pitcher of Sangria one day, then slurping chicken noodle soup the next day. Just so you know, only my feet, hands and the tip of my nose get extremely cold whenever there is a cold snap in the air and I hate it. Goodbye summer and curse you fall. Surprisingly enough, fall is my favorite season because I can get a bit more creative with everything ranging from food to clothing. I also love the different scents of fall.

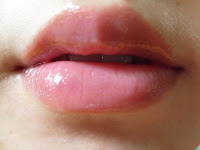
The stand out product for me this summer has to be the Nars Lipgloss in Easy Lover. It is pricey at $24 and this is one of those products that I want to repurchase but shouldn't because of the high price tag.
It looks hot pink with a blueish sheen to it in the tub but do not let this deceive you. The lipgloss comes in typical Nars-ish packaging with what looks to be 8g of product. Searching for the amount of product almost made me go cross eyed. Warning : The print is extremely small. I managed to get this in a set for a really good price long ago, but sadly the set is no longer available.
See how bright that looks! However, if you're looking for a strong hot pink gloss, look elsewhere.

This lip gloss is extremely sheer, but that's the charm. Easy lover gives a nice flush to the lips and tends to brighten up my whole face. For some reason, whenever I apply this gloss, my skin looks younger and clearer. The doe foot applicator makes application easy while the lipgloss tends to be a tad bit sticky. Usually I don't like sticky glosses but for some reason, I really like the texture and feel of this one. It doesn't feel liquidy but feels dense and I gives off a high gloss shine.

See how bright and pink my lips look! My natural color is a nice mauve, but for some reason, this gloss tends to make it more lighter and pink. I lurve this so much and it's perfect for those who want a sheer pop of bright color on the lips.

By the way, my mother told me this tip for getting rid of cold hands and feet. She used to be the same way until she got pregnant. The cure cold hands and feet, according to my mother, go get knocked up. Geez, between her and my grandmother, it's a miracle I didn't end up being a troubled teen mom.

Sunday, September 4, 2011

Revlon's Age Defying Moisturizing Concealer in Medium

I've never really needed concealers for my under eye area because I have don't have harsh dark circles. While I was at the drugstore, I saw this product at the clearance bin and thought to try it out. Originally I had purchased this for the purpose of concealing blemishes and acne marks, but since the color range and the lighting was off at the drugstore, I think I got the wrong color.
Revlon's Age Defying Concealer in Medium, with Spf 25, was what I had purchased, and right now, I'm still on the fence about it. Get ready to see a bunch of close up eye pictures.


This is my face with nothing but moisturizer and eye cream. See, very little discoloration under the eye, and most of it is concentrated in the lower inner corner.

The lightest color in the range seemed to be too light, but this was the only other one step up in color range that was available. This ended up being too orange and a tad bit too dark on my skin, so I decided to put this to the test on my under eye area. It's a bit creamier than liquid concealer and it comes in a squeeze tube that makes it easier to regulate how much product comes out of it. It was easy to blend with my fingers and like all concealers, a little bit goes a long way.

This is with the concealer blended in with no powder. The lighting make it seem like my under eye got darker, but this concealer seemed to do the trick in covering up the discoloration. The only off thing that bothers me is the color. If I place this anywhere else besides the area of discoloration, it tends to make the skin around it seem orange. So I have to be extra careful where to place the product.

This is the picture after applying Maybelline Dream Matte powder under the eyes. It settles a bit into my fine lines, but I have not yet come across a concealer that did not do so. After a couple of hours and when my natural oils began to shine, the concealer seems to blend into the skin better and doesn't seem to accentuate the fine lines much. The concealer lasts for a good while under the eyes and while I'm fairly satisfied with this product; I feel as if this product may not be as good for people with darker circles. I have heard that the color comes in Light/Medium, so maybe that might be a better fit for next time.

I've noticed that the sale and the $10 or less gift section of Sephora is a dangerous place to visit for a girl who is watching her makeup budget. There are more than a couple of things I am dying to try out, including the Sephora Brand Smoky Khol and Jumbo eyeliners. Hope I see a more reviews on them soon, or else I may be tempted to try them myself. I'm also starting a new skincare routine that may or may not make me out to be more hideous than before, so hopefully things will turn out for the better rather than worse.